Introduction
The Computer Numerical Control (CNC) fabrication process offers flexible manufacturing runs without high capital expenditure dies and stamping presses. High volumes are not required to justify the use of this equipment.
Tooling is mounted on a turret which can be as little as 10 sets to as much as 100 sets. This turret is mounted on the upper part of the press, which can range in capacity from 10 tons to 100 tons in capacity.
The turret travels on lead screws, which travel in the X and Y direction and are computer controlled. Alternatively, the workpiece can travel on the lead screws, and move relative to the fixed turret. The tooling is located over the sheet metal, the punch is activated, and performs the operation, and the turret is indexed to the next location of the workpiece. After the first stage of tooling is deployed over the entire workpiece, the second stage is rotated into place and the whole process is repeated. This entire process is repeated until all the tooling positions of the turret are deployed.
Advantages
•The process is very flexible in being able to produce many different configurations of parts due to the modular nature of the tooling employed. In most cases, most of the punches and dies are already available and they can be mixed and matched to produce a variety of configurations.
•Due to the fact that most of the tooling is "available"; the lead-time for tooling is reduced or non-existent. All that needs to be done is to schedule the work order in the production shop, after the programming of the CNC process is done.
• The quantities that can be economically made can be in the thousands depending on the complexity of the part. Simple outer contours and normal size holes will allow the use of this process for many thousands of parts. However, when the part design involves irregular outer contours or large holes requiring a long cycle time, then dedicated tooling can be justified for smaller production runs. Certain parts with tightly spaced hole patterns or slots require expensive dedicated tooling, however with the CNC turret press, these parts can be easily made using standard tooling.
Design Considerations
•To maximize utilization of material, parts are nested as close to each other as possible. They are separated from one another by "micro-ties" which are small width strips that hold the parts together during the punching process. After punching, the parts are separated by vibrating them in a shaker. The parts are known as "shaker parts" or "shake a part". This is very cost effective since no special tooling is necessary for separating them.
•Burrs are inevitable in the stamping process. The burrs are formed on the side of the sheet metal where the punch exits. Properly maintained tools (proper die clearance and sharpening) have burrs that are less than 10 % of stock thickness. When designing parts, the burrs should be confined to areas that will not be exposed to handling and should be either folded away or otherwise shielded form the user. Otherwise, an added operation of deburring needs to be done at added cost.
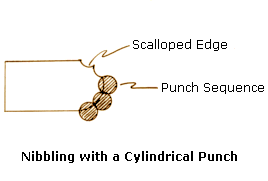
•Flatness/bowing can be an issue if the hole pattern is tight, and/or where excessive material is punched out. This releases the residual stresses in the material, which causes bowing or twisting of the part. Proper use of clamping and strippers can minimize this, as can subsequent straightening operations. Recognizing which side the bow can occur can also allow some designs to accept this out of flat condition by designing features that are not sensitive to this condition. •Edge conditions. Quite often, curves and other difficult features are produced by punching out small sections at a time. This process is called nibbling. This leads to triangular shaped features. These triangular shaped features give the edge a scalloped look. This scalloping can be pronounced if the nibbling pitch is coarse. The amount of scalloping that can be accepted is a function of tooling and product cost. Clamp marks are cosmetic in nature, and if objectionable, can be so positioned to cut them away in subsequent processing.
•Lockwashers for threads can be eliminated by forming a dome on the side opposite to the screw head. As the screw is tightened, the domed thread form locks against the male thread and prevents the screw from vibrating loose in service.
•Parts that need to be welded can be positioned very precisely using shear buttons. Shear buttons on one surface are snugly fitted inside the corresponding holes into the other surface. This allows the parts to be self-jigging and eliminate the need for fixtures and other hold-downs.
•Dimensioning. As in all part design, the designer should be aware of process strengths, weaknesses. Datums should be through hole centers rather than edges of parts. This is because edges can have tapers or roll-offs, which can skew a datum and subsequent measurement. Sound practice of tolerancing methods such as geometric dimensioning and tolerancing are appropriate for the dimensioning of these parts.
•Process Tolerances. Feature tolerances can vary from ±0.12 to ±0.38 mm (±0.005 to ±0.015 in). The program can be tweaked (a little!) to improve these numbers. Repeatability is 0.05 mm (0.002 in) as long as the machine lead screw advances only in one direction.

