The operations associated with stamping are blanking, piercing, forming, and drawing.
These operations are done with dedicated tooling also known as hard tooling. This type of tooling is used to make high volume parts of one configuration of part design. (By contrast, soft tooling is used in processes such as CNC turret presses, laser profilers and press brakes). All these operations can be done either at a single die station or multiple die stations — performing a progression of operations, known as a progressive die.
Equipment Types
The equipments of stamping can be categorized to two types: mechanical presses and hydraulic presses.
Mechanical Presses: Mechanical presses has a mechanical flywheel to store the energy, transfer it to the punch and to the workpiece. They range in size from 20 tons up to 6000 tons. Strokes range from 5 to 500 mm (0.2 to 20 in) and speeds from 20 to 1500 strokes per minute. Mechanical presses are well suited for high-speed blanking, shallow drawing and for making precision parts.
Hydraulic Presses: Hydraulic Presses use hydraulics to deliver a controlled force. Tonnage can vary from 20 tons to a 10,000 tons. Strokes can vary from 10 mm to 800 mm (0.4 to 32 in). Hydraulic presses can deliver the full power at any point in the stroke; variable tonnage with overload protection; and adjustable stroke and speed. Hydraulic presses are suitable for deep-drawing, compound die action as in blanking with forming or coining, low speed high tonnage blanking, and force type of forming rather than displacement type of forming.
Tooling Considerations
•Optimum clearance (total = per side × 2) should be from 20 to 25% of the stock thickness. This can be increased to 30% to increase die life.
•Punch life can be extended by sharpening whenever the punch edge becomes 0.125 mm (0.005 in) radius. Frequent sharpening extends the life of the tool, cuts down on the punch force required. Sharpening is done by removing only 0.025 to 0.05 mm (0.001 to 0.002 in) of the material in one pass with a surface grinder. This is repeated until the tool is sharp. If it is done frequently enough, only 0.125 to 0.25 mm (0.005 to 0.010 in) of the punch material is removed.
•Grinding is to be done with the proper wheel for the tool steel in question. Consult with the abrasive manufacturer for proper choice of abrasive material, feeds and speeds, and coolant.
•After sharpening the edge is to be lightly stoned to remove grinding burrs and end up with a 0.025 to 0.05 mm (0.001 to 0.002 in) radius. This will reduce the chance of chipping.
•Punching Force: Punching can be done without shear or with shear.
-Punching without shear. This is the case where the entire punch surface strikes the material square, and the complete shear is done along the entire cutting edge of the punch at the same time. Punching Force = Punch Perimeter × Stock thickness × Material Shear Strength.
e.g.,
Punch Diameter = 25 mm (1 in),
Circumference = 78.54 mm (3.092 in)
Thickness = 1.5 mm, (0.060 in)
Material Shear Strength (Steel) = 0.345 kN/mm2 (25 tons/in2)
Punching Force = 78.54 × 1.5 × 0.345 (3.09 × 0.060 × 25)
= 40.65 kN (4.64 tons)
= 4.14 Metric Tons (4.64 US Tons)
-Punching with shear. This is the case where the punch surface penetrates the material in the middle, or at the corners, first, and as the punch descends the rest of the cutting edges contact the material and shear the material. The distance between the first contact of the punch with the material, to when the whole punch starts cutting, is the Shear Depth. Since the material is cut gradually (not all at the same time initially), the tonnage requirement is reduced considerably.
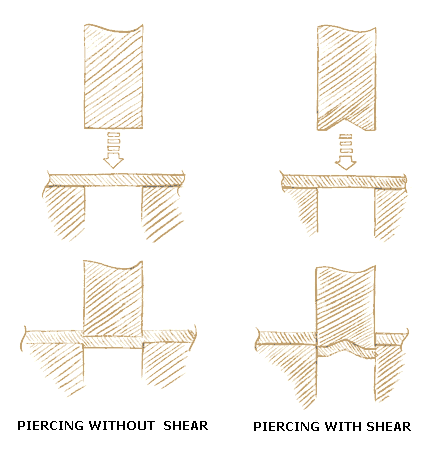
-The Punching Force calculated above is multiplied by a shear factor, which ranges in value form 0.5 to 0.9 depending on the material, thickness, and shear depth. For shear depths of 1.5 mm (0.060 in) the shear factor ranges from 0.5 (for 1.2 mm / 0.047 in stock) to 0.9 (for 6.25 mm / 0.25 in stock). For shear depth of 3 mm (0.120 in) the shear factor is 0.5.
Punching Force = Punch Perimeter × Stock thickness × Material Shear Strength × Shear Factor.
Since shear factor is about 0.5, the Punching Force is reduced by about 50%.
For the same example above,
Punching Force = 78.54 × 1.5 × 0.345 (3.09 × 0.060 × 25) × 0.5 (Shear Factor)
= 40.65 kN (4.64 tons) × 0.5
= 2.07 Metric Tons (2.32 US Tons)
Blanking
Blanking is cutting up a large sheet of stock into smaller pieces suitable for the next operation in stamping, such as drawing and forming. Often this is combined with piercing.
Blanking can be as simple as a cookie cutter type die to produce prototype parts, or high speed dies that run at 1000+ strokes per minute, running coil stock which has been slit to a specified width.
For production parts, the final configuration of the drawn or formed shape needs to be established before the blank die can be built-since the blank size and the slit width size needs to be established precisely.
Design Considerations
•Corners should have a minimum radius of 0.5 x material thickness or 0.4 mm (0.016in) whichever is greater. Sharper corners can be produced but at a greater die maintenance costs and more burrs.
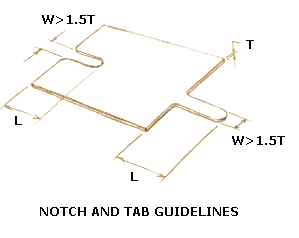
•Slots or tabs widths should be greater than 1.5 X stock thickness.
The length can be a maximum of 5 times slot/tab width.
These rules can be violated at an increased tooling cost-- width as low as 1 X thickness and length as high as 7 X thickness can be achieved.
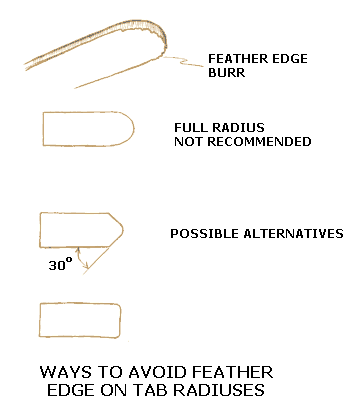
•On cutoffs, avoid full radiuses across the width of stock. A square cut-off is best. If a radius is necessary, then an angle-blended radius is best.
 Burrs
Burrs
Burrs: Burrs are the normal by product of the stamping process. Burrs are often not acceptable, usually for safety reasons, either for handling or for product safety (burrs cutting into insulation, or mechanical chafing). Another reason could be to improve surface appearance-discoloration from welding/brazing, oxidation, scale from heat treatment etc.
Cosmetics requirements of finished parts sometimes require graining. Graining is used to hide surface defects by creating uniform scratches using an abrasive belt sander for example. This results in an even surface appearance. Like all finishing operations, this is to be avoided since it adds extra costs to the product. The grinding grit can range from #100 for removal of gross defects, to about #180 for materials that need silk screening. The abrasives used are dependant on the material. Aluminum oxide is used for steels and silicon carbide is used for softer materials such as aluminum.
A normal burr from well-maintained tools is usually less than 10% of material thickness. If burrs are not acceptable (burr-free requirement), then deburring needs to be done. Typically deburring results in a rounded edge with a radius of 0.05 to 0.075 mm (0.002 to 0.003 in).
Deburring: Deburring is done by tumbling parts in a barrel or a vibratory bowl, along with finishing media. Ceramic media is often used for steels. For softer materials, plastic media, walnut shells etc can be used. This type of deburring is usually confined to unfinished materials. For materials that are already finished, such as pre-plated or pre-painted materials bulk deburring operations are not suitable, because the deburring will remove the finish along with the burrs. For these materials, other forms of deburring such as belt sanding or hand filing will have to be done with the associated higher costs.
Deburring can be avoided by considering the direction of the burrs in the design of the parts. If the burrs will be in a non-accessible area or will be folded later, then deburring can be avoided.
drawing
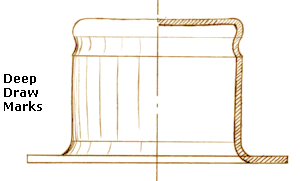
In drawing, a blank of sheet metal is restrained at the edges, and the middle section is forced by a punch into a die to stretch the metal into a cup shaped drawn part. This drawn part can be circular, rectangular or just about any cross-section.
Drawing can be either shallow or deep depending on the amount of deformation. Shallow drawing is used to describe the process where the depth of draw is less than the smallest dimension of the opening; otherwise, it is considered deep drawing.
Drawing leads to wrinkling and puckering at the edge where the sheet metal is clamped. This is usually removed by a separate trimming operation.
Design Considerations
•Round shapes (cylinders) are easiest to draw. Square shapes can also be drawn if the inside and outside radiuses are at least 6 X stock thickness. Other shapes can be produced at the cost of complexity of tooling and part costs.
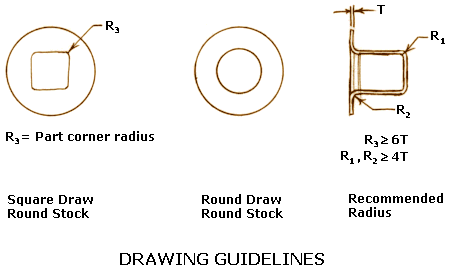
•The corner radiuses can be reduced further by successive drawing operations, provided there is sufficient height for the draw.
•Perpendicularity can be held to ±1º, flatness can be held to 0.3%. This can be improved by performing extra operations.
Forming
Forming is similar to bending. Complex parts such as U-sections, channel sections of different profiles can be produced by doing multiple bends.
There is no change in thickness. Good dimensional repeatability as well as close tolerances is possible with this process.
Design Considerations
•On bends, the short leg (inside length) should be a minimum of 2.5 X stock thickness + radius.
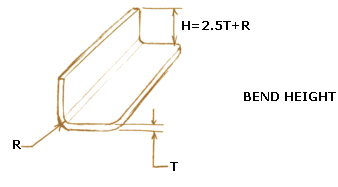
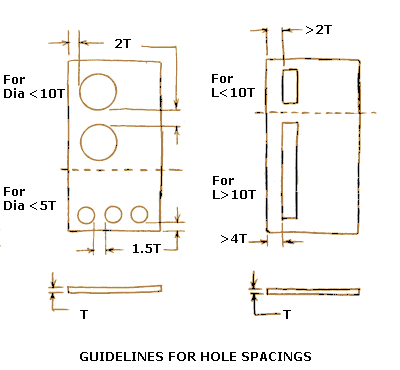
•Minimum hole (and short slot) to bend distance should be 2.5 X the stock thickness + bend radius. For long slots, the distance should be 4 X the stock thickness + bend radius.
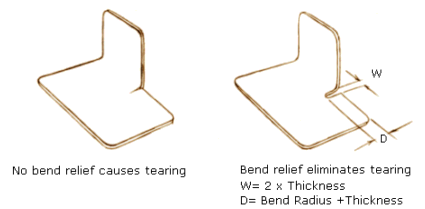
•Bending using tight radiuses or in hard materials often results in burrs and fractures on the outside of the bends. These can be eliminated by using larger bend radiuses and by providing relief notches at the edges on the bend line.
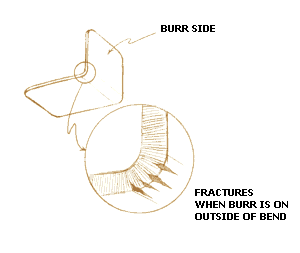
•Bend relief notches should be provided = 2 X stock thicknesses in width (minimum 1.5mm / 0.060 in) and radius + stock thickness in length.
•Generally, bending perpendicular to rolling direction is easier than rolling parallel to the rolling direction. Bending parallel to the rolling direction can often lead to fracture in hard materials.
Thus bending parallel to rolling direction is not recommended for cold rolled steel > Rb 70. And no bending is acceptable for cold rolled steel > Rb 85.
Hot rolled steel can be bent parallel to the rolling direction.
Gage for Common Sheet Metals
Metal Gages are often used in the sheet metal industry. The following table illustrates the sizes of the most used sizes. Note that the Mild Steel Gage is covered in greater detail elsewhere in this site. The values presented here may be used for reference and comparison to other materials.
Drilling, tapping, counterboring, and countersinking are the usual operations done in sheet metals.
Drilling: Drilling is done in sheet metal only when piercing cannot deliver the accuracy required. For example, on a formed part, when holes on different features need to be coaxial, the accuracy obtained by machining may be required.
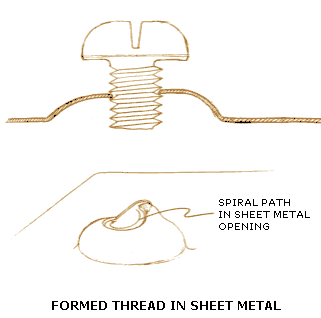
Tapping: Tapping can be done using cut threads or formed threads. Formed threads (thread rolling) is preferable for the following reasons:
Thread rolling is faster than cutting.
Fewer burrs are generated, so no clean up is required or risk of future hazards such as shorting with electronic components.
Larger sized holes are required for thread rolling vs. tapping, resulting in improved tap life.
Rolled threads are stronger due to cold working. Typically, rolled threads are 20% stronger than cut threads.
For very thin stock, either threaded fasteners such as clinch nuts, or forming thread in extruded holes is recommended.
OR
The material is upset in the sheet metal hole to form one thread pitch.
Counterboring: Counterboring is often done to provide clearance and a bearing surface for the fastener's head.
Countersinking: Countersinking allows for flush mounting of flat head fasteners. Countersinking cannot always be done for very thin stock or for very large fasteners.
Piercing is the operation of cutting internal features (holes or slots) in stock. Piercing can also be combined with other operations such as lance and form (to make a small feature such as tab), pierce and extrude (to make an extruded hole). All these operations can be combined with blanking.
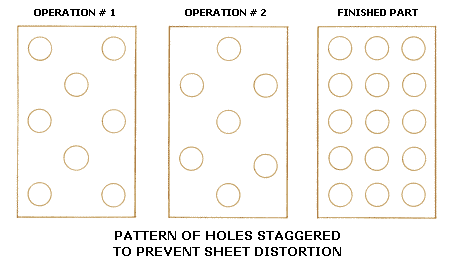
Piercing of all the holes is best done together to ensure good hole-to-hole tolerance and part repeatability. However if the material distorts, the method described below can be done.
When there are large numbers of holes, in a tight pitch, there could be distortions, due to the high amount of tension on the upper surface due to stretching and compression on the bottom surface. This causes the material not to lay flat. This can be avoided/lessened by staggering the piercing of the holes. Holes are punched in a staggered pattern; then the other holes are punched in the alternate staggered pattern.
Design Considerations
•Minimum hole diameter should be at least 20 % greater than stock thickness. In the case of stainless steels, it should be 2 times the material thickness.
•Minimum wall thickness (distance from hole to edge or hole to hole) should be at least 2 times stock thickness.
•For non-round slots, the minimum wall thickness should be 2 times thickness for short slots < 10 thicknesses long; and 4 times thickness for long slots > 10 thicknesses long.

•Minimum hole (and short slot) to bend distance should be 2.5 × the stock thickness + bend radius.
•For long slots, the distance should be 4 × the stock thickness + bend radius.

