Sand casting is used to make large parts (typically Iron, but also Bronze, Brass, Aluminum). Molten metal is poured into a mold cavity formed out of sand (natural or synthetic). The processes of sand casting are discussed in this section, include patterns, sprues and runners, design considerations, and casting allowance.
Patterns
The cavity in the sand is formed by using a pattern (an approximate duplicate of the real part), which are typically made out of wood, sometimes metal. The cavity is contained in an aggregate housed in a box called the flask. Core is a sand shape inserted into the mold to produce the internal features of the part such as holes or internal passages. Cores are placed in the cavity to form holes of the desired shapes. Core print is the region added to the pattern, core, or mold that is used to locate and support the core within the mold. A riser is an extra void created in the mold to contain excessive molten material. The purpose of this is feed the molten metal to the mold cavity as the molten metal solidifies and shrinks, and thereby prevents voids in the main casting.
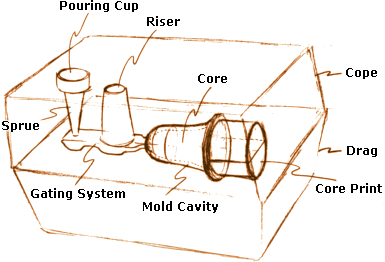
Typical Components of a Two-part Sand Casting Mold.
In a two-part mold, which is typical of sand castings, the upper half, including the top half of the pattern, flask, and core is called cope and the lower half is called drag. The parting line or the parting surface is line or surface that separates the cope and drag. The drag is first filled partially with sand, and the core print, the cores, and the gating system are placed near the parting line. The cope is then assembled to the drag, and the sand is poured on the cope half, covering the pattern, core and the gating system. The sand is compacted by vibration and mechanical means. Next, the cope is removed from the drag, and the pattern is carefully removed. The object is to remove the pattern without breaking the mold cavity. This is facilitated by designing a draft, a slight angular offset from the vertical to the vertical surfaces of the pattern. This is usually a minimum of 1?or 1.5 mm (0.060 in), whichever is greater. The rougher the surface of the pattern, the more the draft to be provided.
Sprues and Runners
The molten material is poured in the pouring cup, which is part of the gating system that supplies the molten material to the mold cavity. The vertical part of the gating system connected to the pouring cup is the sprue, and the horizontal portion is called the runners and finally to the multiple points where it is introduced to the mold cavity called the gates. Additionally there are extensions to the gating system called vents that provide the path for the built up gases and the displaced air to vent to the atmosphere.
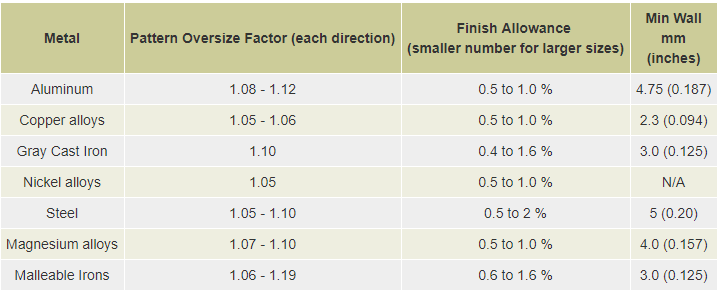
The cavity is usually made oversize to allow for the metal contraction as it cools down to room temperature. This is achieved by making the pattern oversize. To account for shrinking, the pattern must be made oversize by these factors, on the average. These are linear factors and apply in each direction. These shrinkage allowance are only approximate, because the exact allowance is determined the shape and size of the casting. In addition, different parts of the casting might require a different shrinkage allowance. See the casting allowance table for the approximate shrinkage allowance expressed as the Pattern Oversize Factor.
Sand castings generally have a rough surface sometimes with surface impurities, and surface variations. A machining (finish) allowance is made for this type of defect. See casting allowance table for the finish allowance.
Design considerations
•Location of the parting line/plane. By properly locating the parting plane.
•The number of cores can be reduced.
•The gating can be made less elaborate.
•The material wasted can be reduced.
•The dimensional accuracy can be increased.
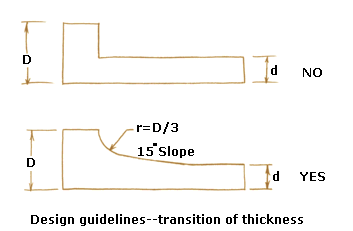
•Use of uniform thicknesses in a casting, where possible. Uniform thicknesses lead to uniform cooling and solidification. This leads to stress free and distortion free castings. Heavier sections cool more slowly, and may have shrinkage cavities, porosities and large grain structures. Voids, porosities and cracks can be sites of subsequent failures and should gestation be prevented by minimizing variations in cross sections.
•When uniform cross-sections cannot be maintained, then changes in cross-sections must be gradual. A recommended way to achieve this is to use a transition radius of 1/3 of the thicker section and blend in the radius with a 15-degree slope line.
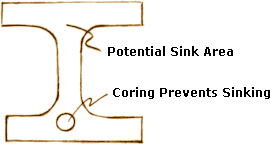
•When two or more uniform sections intersect, they create a region of heavy cross-section, resulting in the problems mentioned earlier. One way to minimize this is to core the intersection by a hole, similar to a hub hole in a wheel with spokes.
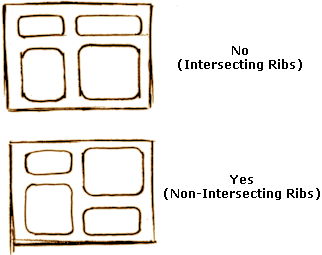
•When sections intersect to form continuous ribs, contraction occurs in opposite directions as the material cools down. This leads to a high stress area at the intersections, causing cracking immediately, or in service. The way to avoid this is to stagger the ribs and thereby maintain uniform cross-sections.
•Large unsupported areas tend to warp, so they should be avoided.
•In addition, a minimum wall thickness must be maintained to avoid voids and non-fill areas. See casting allowance table for minimum wall thickness for some common metals.
Pattern, Finish Allowance, and Wall Thickness
