Rapid Tooling
Introduction
The term Rapid Tooling (RT) is typically used to describe a process which either uses a Rapid Prototyping (RP) model as a pattern to create a mold quickly or uses the Rapid Prototyping process directly to fabricate a tool for a limited volume of prototypes. RT is distinguished from conventional tooling in that:
a) Tooling time is much shorter than for a conventional tool. Typically, time to first articles is below one-fifth that of conventional tooling.
b) Tooling cost is much less than for a conventional tool. Cost can be below five percent of conventional tooling cost.
c) Tool life is considerably less than for a conventional tool.
d) Tolerances are wider than for a conventional tool.
We do not intend to comprehensively cover all types of RT in this narrative. In addition to Silicone Rubber Molding (SRM), we present Composite Molding and Direct AIM (ACES Injection Molding). The field of RT is expanding rapidly and information on many of the new methodologies is still changing.
Highlights for All SRM Methodologies
Mold Fabrication Time: From pattern to first part in 3-15 days.
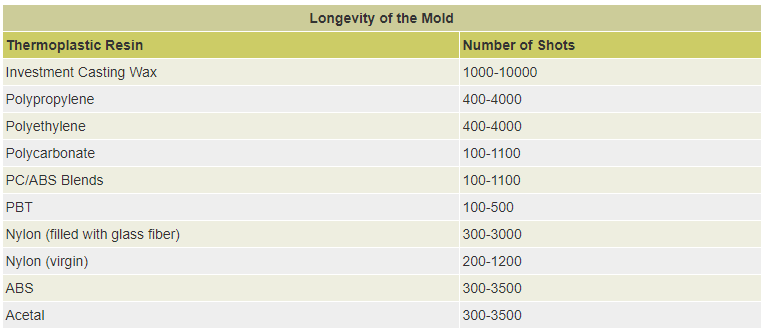
Material and Quantities of Parts Produced from a Mold in Table Below:

(These are estimates only for a part of average complexity with a typical material such as urethane. More detail leads to faster degradation.)
RTV Silicone Rubber Molding Process Description
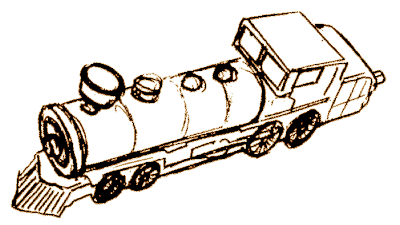
Room Temperature Vulcanization (RTV) rubber molds are the least expensive and fastest way to create about a dozen prototype parts. As shown in the figure below, even with undercuts, the part is able to be removed through distortion of the mold. The figure illustrates a small toy locomotive molded with urethane.
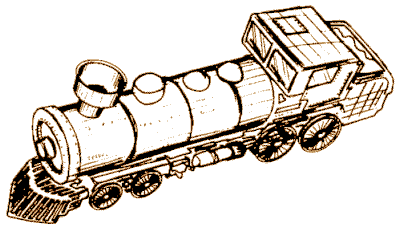
Urethane casting material is commonly used for product prototypes. Urethane can be formulated to have material properties similar to elastomers or ABS. Urethane can be machined, sanded, glued, and painted. Urethane can have material properties, color, and surface texture very similar to that of production materials.
An RP pattern is used to create a master male pattern as shown below. The RP technique most often used is the SLA process.
The SLA part is made slightly larger (e.g. 0.003 in/in) than the final product since this is what shrinkage the final part will see.
The SLA part is sanded to a suitable cosmetic finish and can be sealed.
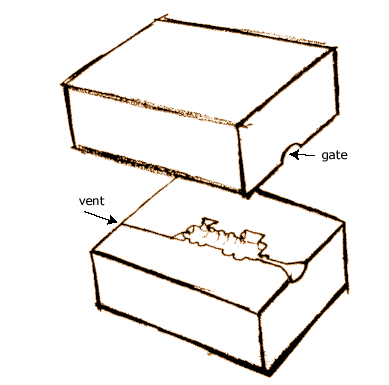
The master pattern is fitted with a sprue and gate and then surrounded by a parting surface which establishes the parting line for the mold (see the illustration). Alternatively, the cured mold can be cut carefully to form the parting line.
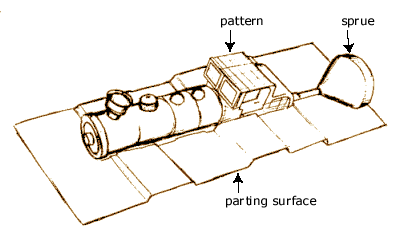
The assembly is fixtured in a vat, and liquid RTV is then poured over the pattern and parting surface combination as shown below.
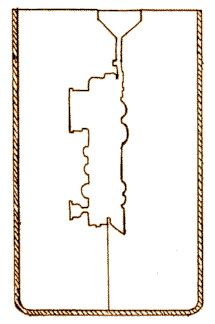
Once cured, the RTV is removed from the vat and separated from the pattern and parting line surface to yield the two halves of the molding tool. RTV air-cures, so that the cure time depends on the geometry, the RTV type, and the environment. Cure time can range from .5 to 40 hours. Aging of the mold after cure for up to three days can improve mold life.
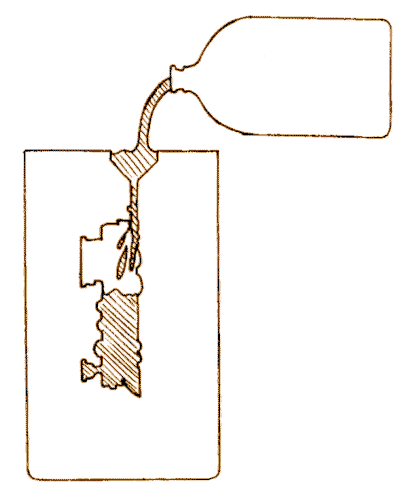
Thermoset resin such as urethane is poured or injected into the mold, as shown below.
Finally, the finished part is removed from the mold. Undercuts are overcome by distorting the mold, which springs back to its original shape as long as distortion is not too severe.
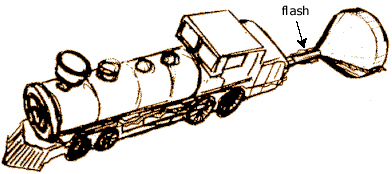
The part must then be post-processed by trimming any flash, as shown below, and possibly sanding. The gate and sprue must also be removed.
Gravity Casting
Production Rate: Three shots each day.
Simple gravity resin insertion lends simplicity, but voids can easily form since there is no pressure.
Cheap and quick.
The urethane can be gravity-flowed into the mold. This is easy to implement, but not all thin-wall areas are likely to fill. Gravity casting is demonstrated in the last of series of SRM figures.
Vacuum Casting Molding
Production Rate: 15-25 parts each week.
Vacuum costs money and takes tooling time.
Parts are of higher quality than with Gravity Casting, with thinner walls and fewer voids.
Materials can simulate ABS, Nylon, Polycarbonate, etc.
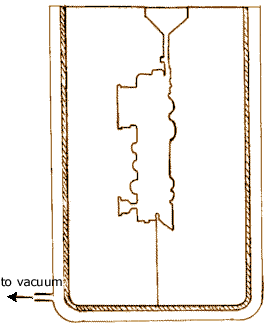
VCM involves using a vacuum jacket on the mold and injection pressure to fill thin-wall areas. The figure below illustrates the vacuum configuration, which is similar to the vacuum jacket used for injection or transfer molds.
Thin Wall Rim
Production Rate: 3-4 each hour.
Tooling Cost: About $3000 for a typical consumer product part of 5"x5"x3"(12.7x12.7x7.6 cm).
Accuracy: As accurate as the SLA prototype: ±0.005" (±0.127 mm).
Mold Fabrication Time: 10 days from pattern to first part.
The Thin Wall Rim method can produce copies of RP patterns at about three or four per hour. Short cycle time is due to the fast gel time (one minute) of the polyurethanes used. They can be de-molded after about 10 min.
Automated mixing heads have helped because of the following:
The two-part resin is automatically mixed in a vacuum.
The material is shot into the mold.
Parts coated with hardened polyurethane are disposable.
These automatic injection heads have come down in price, increasing the popularity of auto mixing. Equipment that handles fast-curing resins can now run only $4000. Fast curing resins also lengthen soft mold life, since the curing process is a major reason for mold break down. Before automated mixing heads, the two parts of the resin needed to be mixed, then de-gassed in a vacuum, and then finally poured into an injector for insertion into the mold. Since these steps were time-consuming, it was impractical to shoot materials that had pot lives of less than a few minutes.
Composite Epoxy Molding
Mold Fabrication Time: 2-6 weeks.
Production Rate: cycle time of 3 to 15 minutes.
Accuracy: As good as the SLA pattern: ±0.005 inches (±0.127 mm).
Cost: $2000 (about half that of an Al soft tool) for a consumer product part of 5"x5"x3" (12.7x12.7x7.6 mm).
Advantages increase with the complexity of the molded part.
Composite tooling bridges the gap between silicone rubber soft molds and aluminum "soft tools". It has advantages in between the two RT methods:
Composite tooling can use production materials (thermoset plastics).
Less expensive than an aluminum tool.
Lower lead time than aluminum tool.
From one mold, 50-500 pieces can be produced.
Part can be of moderate to high complexity.
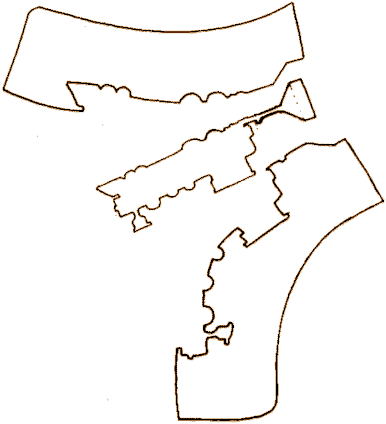
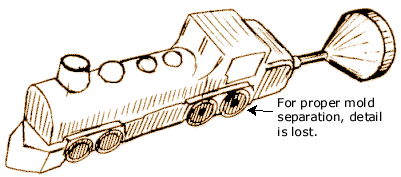
Since the consistency of the mold is hard, it cannot be distorted to ensure part release. Therefore, elimination of undercuts and the implementation of draft is necessary, as shown in the figure below. As can be seen in the figure, much detail is lost because of the need to make a non-distorting tool that releases the part.
Composite Molding Process Steps
A master male pattern is made. The master can be made from any material that can tolerate epoxy, such as foam or wood. However, typically the master pattern is a stereolithography part. See the figure below.
An RTV mold is made of the master pattern and a urethane male pattern is made from the mold. The reason for this is that in the epoxy mold fabrication process, the male pattern is typically destroyed. A parting line surface is added, as shown below.
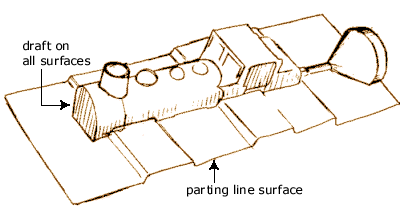
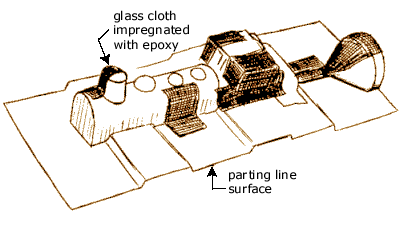
Epoxy and glass cloth are layered around the male pattern to form the mold and are cured successively in layers. The figure below
shows the beginning of the "lay up" process for the top half of the mold.
The following figure shows the completed lay up assembly for the top half of the mold.
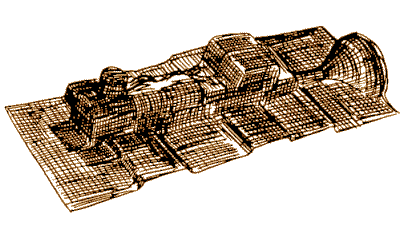
Curing of the mold epoxy can take from 0.5 to 40 hours. Aging the mold at room temperature increases the longevity of the mold.
To structurally strengthen the mold and for fixturing, the epoxy lay up can be potted in a block of epoxy.
After construction of the epoxy mold, steel inserts can be added for complex slides and coring and machining of the epoxy may need to be undertaken for example, in areas where sprues or gates could not be molded in.
AIM and ACES Direct Injection into an SLA Mold
Tooling Cost: $1000 to $1500 for a typical consumer product part of 5"x5"x3" (12.7x12.7x7.6 mm)dimensions.
Production Rate: 10 parts each day per cavity.
Tool Life: < 100 parts.
Accuracy: Similar to that of an SLA: ±0.005 inches (±0.127 mm).
Mold Fabrication Time: 1-2 weeks.
Draft angles and lack of undercuts necessary for release.
 |
 |
In the AIM process, the mold is "grown" using the SLA process. The mold is similar to a regular part SLA, but is the negative image and cut into two halves. The cavity can be filled with a variety of materials, including:
Thermoplastics
Aluminum-filled epoxy
Ceramics
Low-melt temperature metals
The AIM mold parts can be used as inserts in a STANDARD INJECTION MOLDING MACHINE. The molding machine can then go through its process quite similarly to its normal operation. This simplifies material handling and other logistics.

